Terrain Sketch user guide
Terrain Sketch lets you plan a garden to scale in your web browser. You draw the beds, paths and buildings, place plants, check sun and shade, and print plans and shopping lists. This guide shows you how, one step at a time.
Getting started
What it is
Terrain Sketch is a garden design editor that runs in your browser. You draw your yard to scale, add beds and structures, and place plants from a built-in catalog or plants you add yourself. It can also show where shadows fall, list what to buy, and make a PDF you can print and take outside.
You do not need an account (on most sites)
Everything works without signing in. Your projects are saved in this browser, on this device. An account is optional, and only some sites offer it. See Accounts if yours does. Some sites ask you to sign in first: then the app opens with a Sign in to start designing screen.
Saving in the browser is not a backup. Clearing your browser data, using a private window, or moving to another computer can make your projects disappear. Use Export to save a backup file now and then. See Saving and backups.
Look around a sample garden first
To see a finished design before you draw your own, click Open a sample garden on the welcome screen, or click New and choose Sample garden (a finished front yard to explore). It is an ordinary project with a house, a lawn, three beds and plants from the built-in list: select things, move them, open Sun & 3D, print it. Its sizes and its location are examples, not measurements. Delete it in Projects when you are done.
Your first garden in five steps
- Start a project. Click New. Type a name, choose what to Start from (Blank (no site boundary), Rectangular site from dimensions, or Front-yard starter (house + lawn placeholders, to edit)), choose your Display units, and enter the site width and depth, for example 60' and 40'. Click Create project.
- Draw a bed. In the left panel, open Tools and pick Rectangle (or Polygon, Ellipse or Curved bed). Drag on the plan. Or click Enter numerically… and type exact sizes such as 12' 6".
- Choose a plant and place it. Open the Plants tab, search the catalog, and click Use for placing. Click on the plan to place plants one at a time. Or select a bed first and click Fill with plants… to fill it in rows.
- Check the advice and the sun. In the right panel, open Advisories to see notes about light, moisture, hardiness and crowding. Open Sun & 3D to see where shadows fall.
- Print or back up. Click Reports to make a printable PDF packet. Click Export to save a backup file. Do both before you close the tab for the day.
Press ? at any time for the list of keyboard shortcuts. The question mark button in the top bar does the same.
The screen
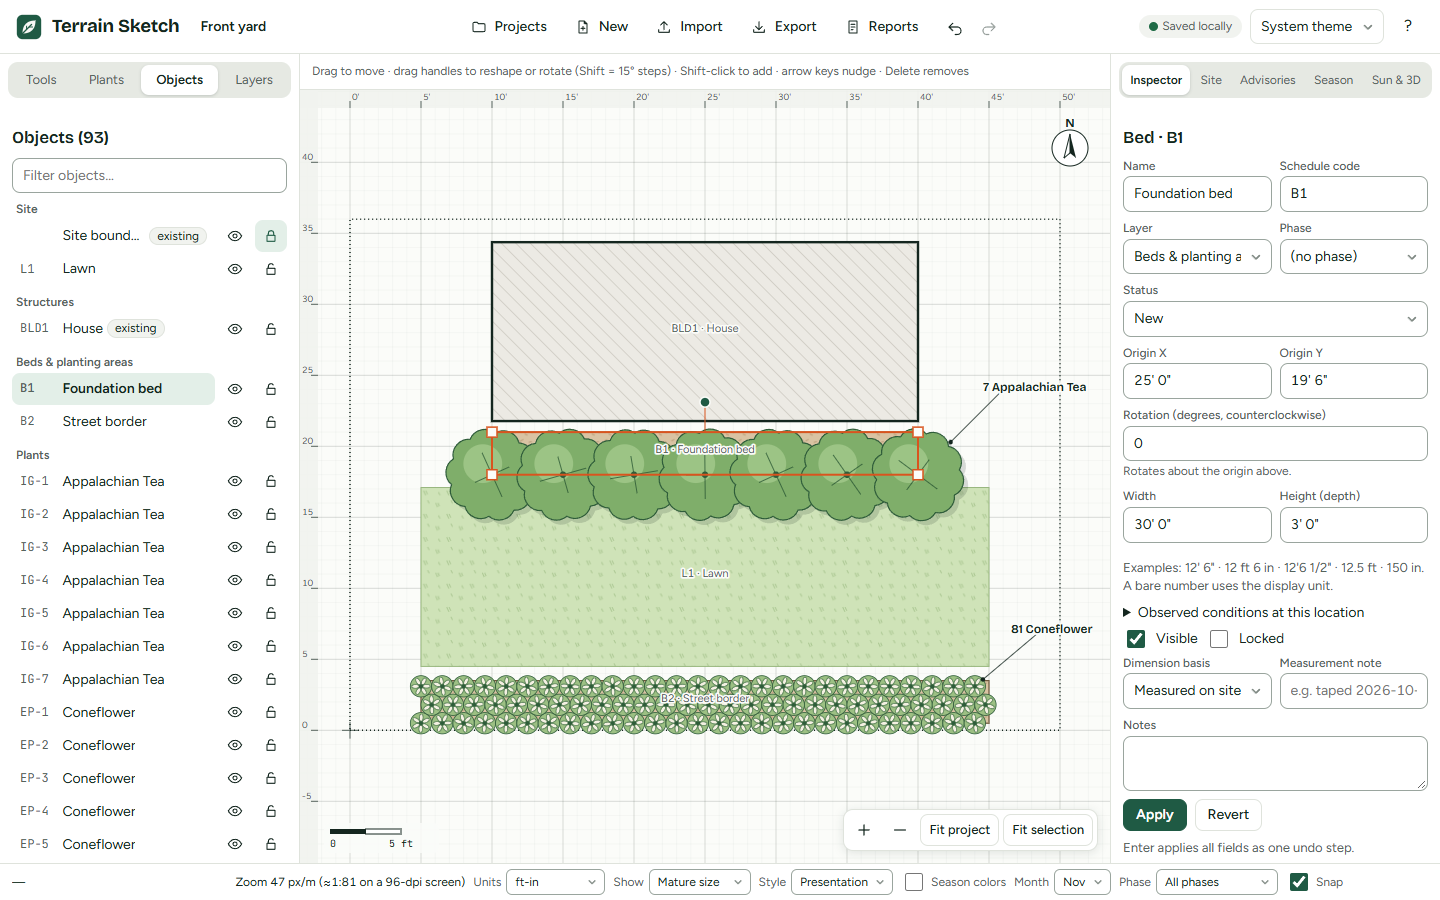
The top bar
- Terrain Sketch (the name, top left) opens a short welcome screen about what the app is and where your work is kept.
- The project name box next to it. Type there to rename the open project.
- Projects opens your saved projects. New starts one. Import opens a backup file. Export saves backups, plans and lists. Reports makes the printable packet and shopping lists.
- Undo and Redo arrows.
- The save status tells you whether your work is saved in this browser. See Saving and backups.
- The theme menu: System theme, Light or Dark.
- Account (it may read Sign in, or show your name once you are signed in). It appears only on sites that have accounts.
- ? opens Help & shortcuts, with a link to this guide.
The left panel
It has four tabs.
- Tools: the drawing tools, their options, a button to Add reference image…, and commands for the selected objects (duplicate, delete, group, order, align, rotate).
- Plants: the plant catalog and the plants already in your project.
- Objects: a list of everything in the project, grouped by layer. You can select, hide and lock items here.
- Layers: layers, installation phases and groups.
The plan
The big area in the middle is your plan. Above it is the hint bar. It tells you what the current tool will do next. While you draw, it shows Enter numerically…, Finish and Cancel buttons when they apply. In the corner are Zoom in and Zoom out buttons, Fit project and Fit selection. Scroll to zoom. Hold Space and drag to pan, or use the Pan tool.
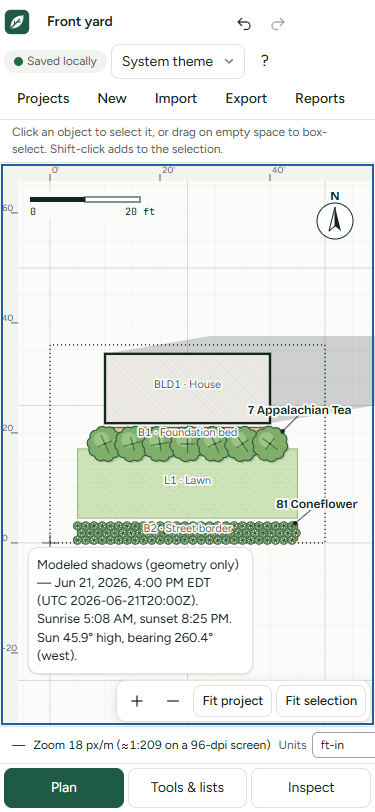
Two small marks are always drawn on the plan itself. The north arrow (top right, marked N) follows the north direction you set on the Site tab. The scale bar (bottom left) shows a round length, in feet or in meters and centimeters to match your units. It changes as you zoom. On a narrow plan the scale bar moves to the top left. Both are for viewing only: reports and exports have their own north arrow and scale.
The right panel
- Inspector: exact numbers for whatever you selected.
- Site: your site's location, time zone, north direction, notes, purchasing settings and browser storage.
- Advisories: notes about your design.
- Season: month view, a seasonal-interest chart, observations and a task checklist.
- Sun & 3D: modeled shadows and the 3D view.
The status bar
At the bottom you see the cursor position and zoom, then these controls:
- Units: ft-in, decimal ft, inches, meters or centimeters. This changes how lengths are shown. It does not change your design.
- Show: Mature size or Planting size. It decides how big plants are drawn on the plan.
- Style: Presentation (the default) or Working. This changes how the plan looks on your screen and in the SVG and PNG exports, and sets the starting choice for the PDF packet. See Plants for what the symbols mean.
- Season colors: color plants by season for the chosen Month.
- Phase: All phases, or show the project only up to a chosen installation phase.
- Snap: turn snapping on or off.
The small i buttons
Some panels start with one short line and a small round i button next to it. Click the button, or tab to it and press Enter, to open the longer note. Click it again to close the note. The notes explain what a feature does not do, such as the limits of the shadow model or the fact that starter plant records are research candidates. Nothing is removed: the full text is always there behind the button.
On a phone or tablet
On narrow screens the three areas share the space. A bar at the bottom switches between Plan, Tools & lists (the left panel) and Inspect (the right panel). Pinch with two fingers to zoom the plan.
Drawing
Pick a tool in the Tools tab, or press its key. The hint bar always says what to do next.
| Tool | Key | What it does |
|---|---|---|
| Select | V | Select, move and reshape objects. |
| Pan | H | Drag to move the view. |
| Rectangle | R | Drag a rectangle. |
| Ellipse | E | Drag a box to make an ellipse. |
| Polygon | P | Click the corners of any shape. |
| Curved bed | C | Click points; drag to pull smooth curves. |
| Hole / cutout | O | Cut a hole inside a bed, patio, lawn or planting area. |
| Path / fence | W | Click points along a line. |
| Place plant | L | Click to place the chosen plant. |
| Structure | S | Click to place a ready-made size. |
| Dimension | D | Click two points to add a measured line. |
| Text note | N | Click to add a text note. |
| Measure | M | Click two points to read a distance. |
Drag, or click point by point
- Rectangle and Ellipse: drag on the plan, then let go. While you drag, the hint bar shows the size. Hold Shift for a square or a circle.
- Polygon, Curved bed and Path / fence: click one point at a time. To finish, press Enter, double-click, or click Finish. A polygon and a curved bed also close if you click the first point again.
- Made a wrong point? Press Backspace to remove the last one. Press Esc to cancel the whole drawing.
- Hold Shift while drawing to keep lines horizontal or vertical.
Before you draw a bed, use Create as under Tool options to say what it is: for example a bed, raised bed, planting area, lawn, patio, building or pond.
Typing exact sizes
Every drawing tool has an Enter numerically… button in the hint bar. It opens a form where you type the size and position instead of dragging.
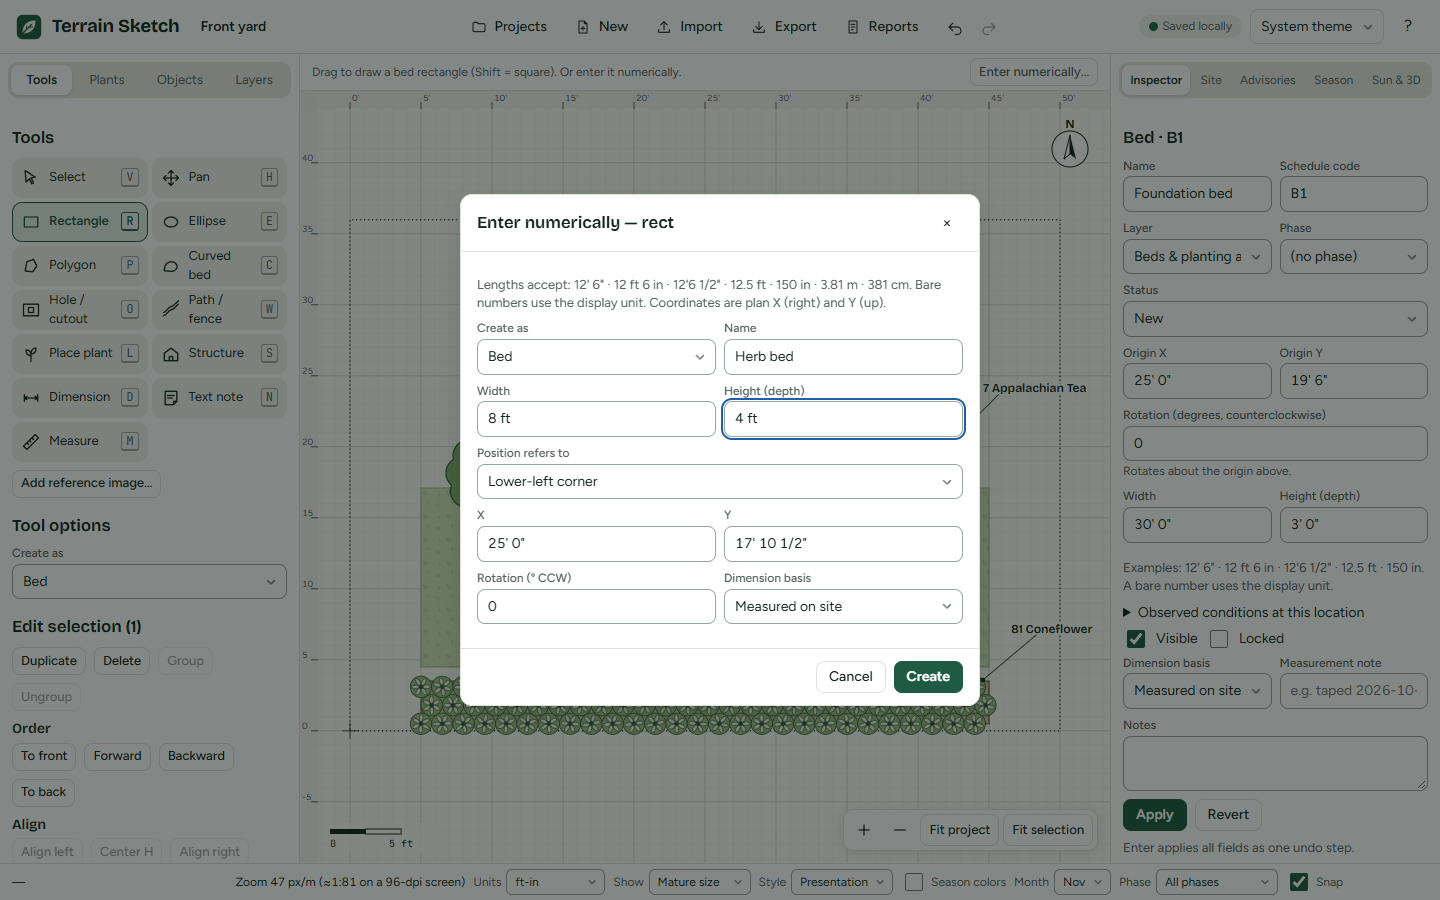
Lengths can be typed in several ways. All of these work:
- 12' 6" or 12 ft 6 in or 12'6 1/2"
- 12.5 ft or 150 in
- 3.81 m or 381 cm
A plain number with no unit uses your display unit. Ambiguous forms such as 12-6 are refused, so nothing is guessed. Positions in the form are plan coordinates: X goes right, Y goes up.
Snapping and the grid
In the Tools tab, under Snapping, you can set the Grid size and turn on or off Snap to grid, Snap to vertices and Snap to edges. Snap distance (screen px) says how close the pointer must be. The Snap box in the status bar switches snapping on and off. Show labels turns object labels on the plan on or off.
Structures, paths and fences
- Structure offers presets: Raised bed 4' × 8', Raised bed 3' × 6', Round container 24" dia., Shed 8' × 10', Greenhouse 6' × 8', Compost bin 4' × 4', Bench 5' × 2' and Boulder / obstacle 3' dia. Pick one under Preset and click on the plan. Heights are left unknown until you enter them.
- Path / fence lets you choose Create as (path, fence, trellis or utility annotation), a Physical width (for a fence or trellis this is its thickness), End caps and Corner joins.
Dimensions, notes and measuring
- Dimension: click two points to place a measured line. It snaps to corners and edges.
- Text note: click where you want it. You are asked for the text.
- Measure: click two points to read a distance. Measurements are not saved and nothing is added to your design.
Tracing a photo or plan
Click Add reference image… in the Tools tab to bring in a PNG, JPEG or WebP picture, such as a plat or an aerial view. At first it has a guessed scale. Select it and click Calibrate scale (two points)…: click two points on the image, type the real distance between them, and click Apply calibration. Use a top-down picture. A normal photo taken from the ground cannot give true sizes, and the calibration is for tracing only, not a survey. Once it is right, lock the image so you do not drag it by accident.
Editing
Selecting
- With the Select tool, click an object. Hold Shift and click to add more.
- Drag on empty space to draw a selection box around several objects.
- Press Ctrl+A to select everything visible.
- Or use the Objects tab: click an item to select it, and Shift-click or Ctrl-click to add more. This works with the keyboard too.
Moving and reshaping
- Drag an object to move it. The arrow keys nudge it by one grid step. Shift nudges five steps, Alt a tenth of a step.
- Drag a handle to resize or reshape. Drag the rotation handle to turn the object; hold Shift to turn in 15° steps.
- On a polygon or a line, drag the small handle at the middle of an edge to add a point. Double-click a corner point to remove it. A shape keeps at least three points (a line keeps two).
- Rectangles and ellipses have no corner points. In the Tools tab, with one selected, click Convert to polygon (edit vertices) or Convert to curve (edit nodes).
- Moving or rotating a bed moves the plants inside it too.
Cutouts (holes)
To leave a hole in a bed, patio, lawn or planting area, select it, choose the Hole / cutout tool, and under Cutout shape pick Polygon (click corners), Rectangle (drag) or Ellipse (drag). Then draw inside the shape. Areas count net of their holes. To change a hole later, select the bed and use Edit hole in the Inspector, or drag the hole's handles on the plan.
Exact numbers in the Inspector
Select an object and the Inspector shows its name, schedule code, layer, phase and status, its position and size, rotation, corner points, height (where it applies) and notes. Change what you like and press Enter or click Apply. All the changes you made there count as one undo step. Revert puts the fields back.
Groups, layers, lock and hide
- Group (Ctrl+G) ties several objects together so they move as one. Ungroup is Ctrl+Shift+G.
- The Layers tab lists layers such as Site, Hardscape, Structures and Plants. The eye button hides a layer and the lock button locks it. Hidden layers stay in the project (and in backups) but are left out of printed and exported plan drawings.
- The same eye and lock buttons sit next to each item in the Objects tab. A locked item cannot be moved, changed or deleted until you unlock it.
- The To front, Forward, Backward and To back buttons change which object is drawn on top.
Status and phase
Each object has a Status: New, Existing (keep), Relocate or Remove. This is how the reports tell what to buy and what is already there. You can also give an object a Phase. See Seasons and phases.
Align, distribute and rotate by an angle
Select two or more objects in the Tools tab and use Align left, Center H, Align right, Align top, Center V and Align bottom. With three or more selected, Distribute H and Distribute V space them evenly. To turn the selection by an exact angle, type it under Rotate and click Rotate about selection center.
The right-click menu
Right-click the plan to get a menu of commands that fit the spot. You can also open it with Shift+F10 or the Menu key, or by pressing and holding on a touch screen. The long press works with the Select and Pan tools. The drawing tools use the Finish and Cancel buttons in the hint bar instead.
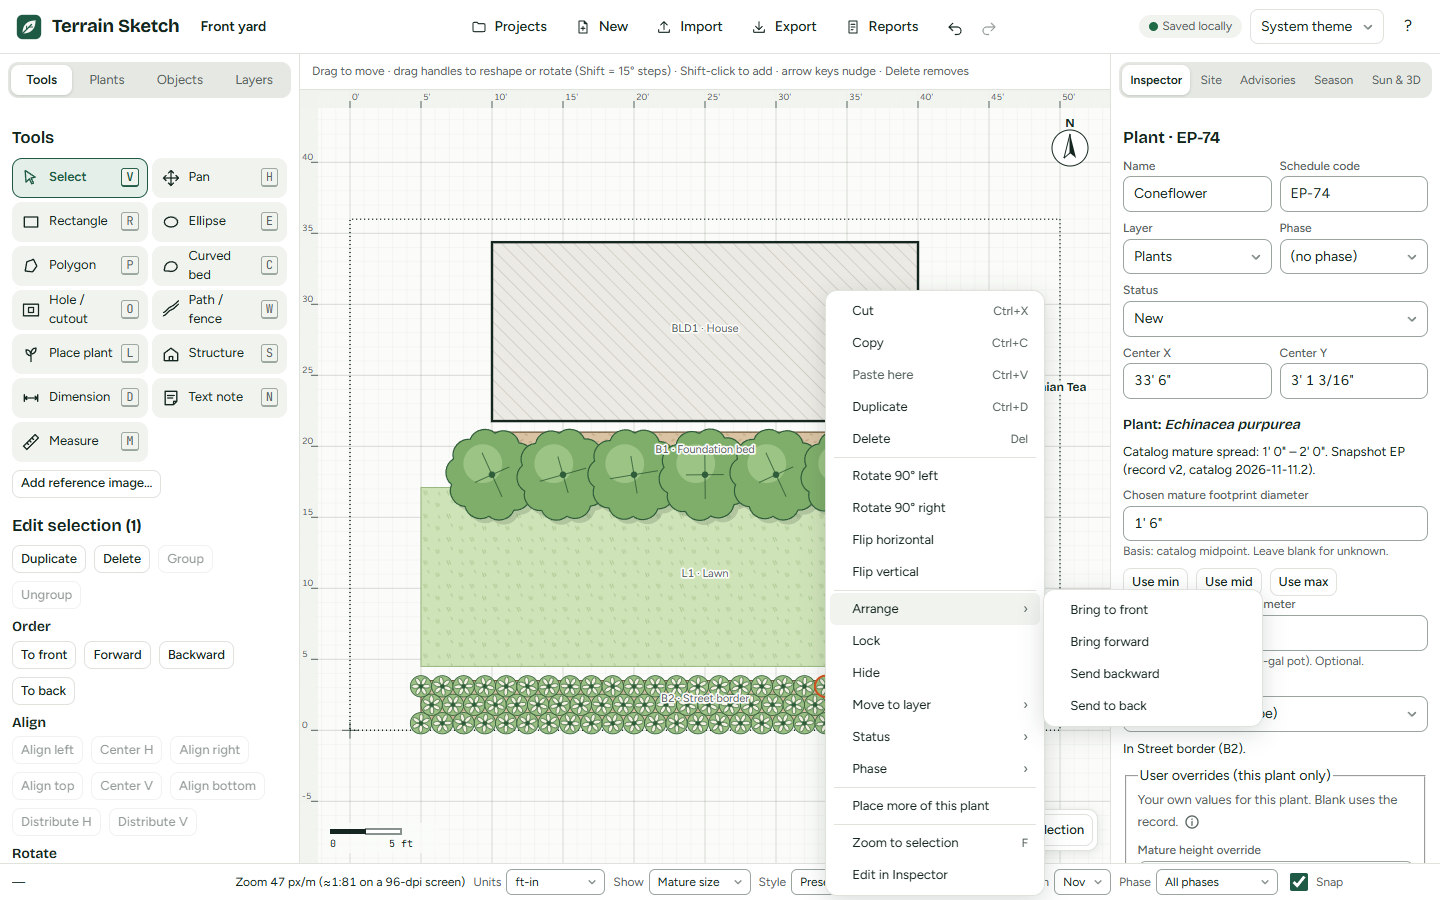
What it offers depends on where you open it:
- On objects: Cut, Copy, Paste here, Duplicate, Delete, Rotate 90° left, Rotate 90° right, Flip horizontal, Flip vertical, Arrange (front and back), Align (with two or more selected), Group and Ungroup, Lock or Unlock, Hide, Move to layer, Status, Phase, Zoom to selection and Edit in Inspector. Depending on what you picked, you may also see Fill with plants…, Cut a hole…, a convert command, Calibrate scale… or Place more of this plant.
- On an edit handle: Add a point here or Remove this point. For a cutout it says Add a cutout point here or Remove this cutout point.
- On empty space: Paste here, a command to place the chosen plant there, Add a text note here…, Select all, Undo, Redo, Zoom in here, Zoom out here and Fit project.
- While you are drawing: Finish, Remove last point, Enter numerically… and Cancel drawing.
Commands that do not apply are grayed out. Hover over one to see why, for example when an object is locked.
Copy, cut and paste
Use Ctrl+C, Ctrl+X and Ctrl+V, or the right-click menu. Paste here puts the copy where you right-clicked. What you copy stays in the open browser tab. It is not on your computer's clipboard, so you cannot paste it into another program. You can open another project in the same tab and paste there. Reference images are not copied. Add the image again where you need it.
Flip and 90° rotation also carry the plants inside selected beds along. Reference images are not flipped.
Undo and redo
Press Ctrl+Z to undo and Ctrl+Shift+Z or Ctrl+Y to redo, or use the arrows in the top bar. One action is one undo step: a whole drag, a whole drawing, one Inspector Apply, one fill. A change that would make the design invalid is refused and leaves your design as it was.
Plants
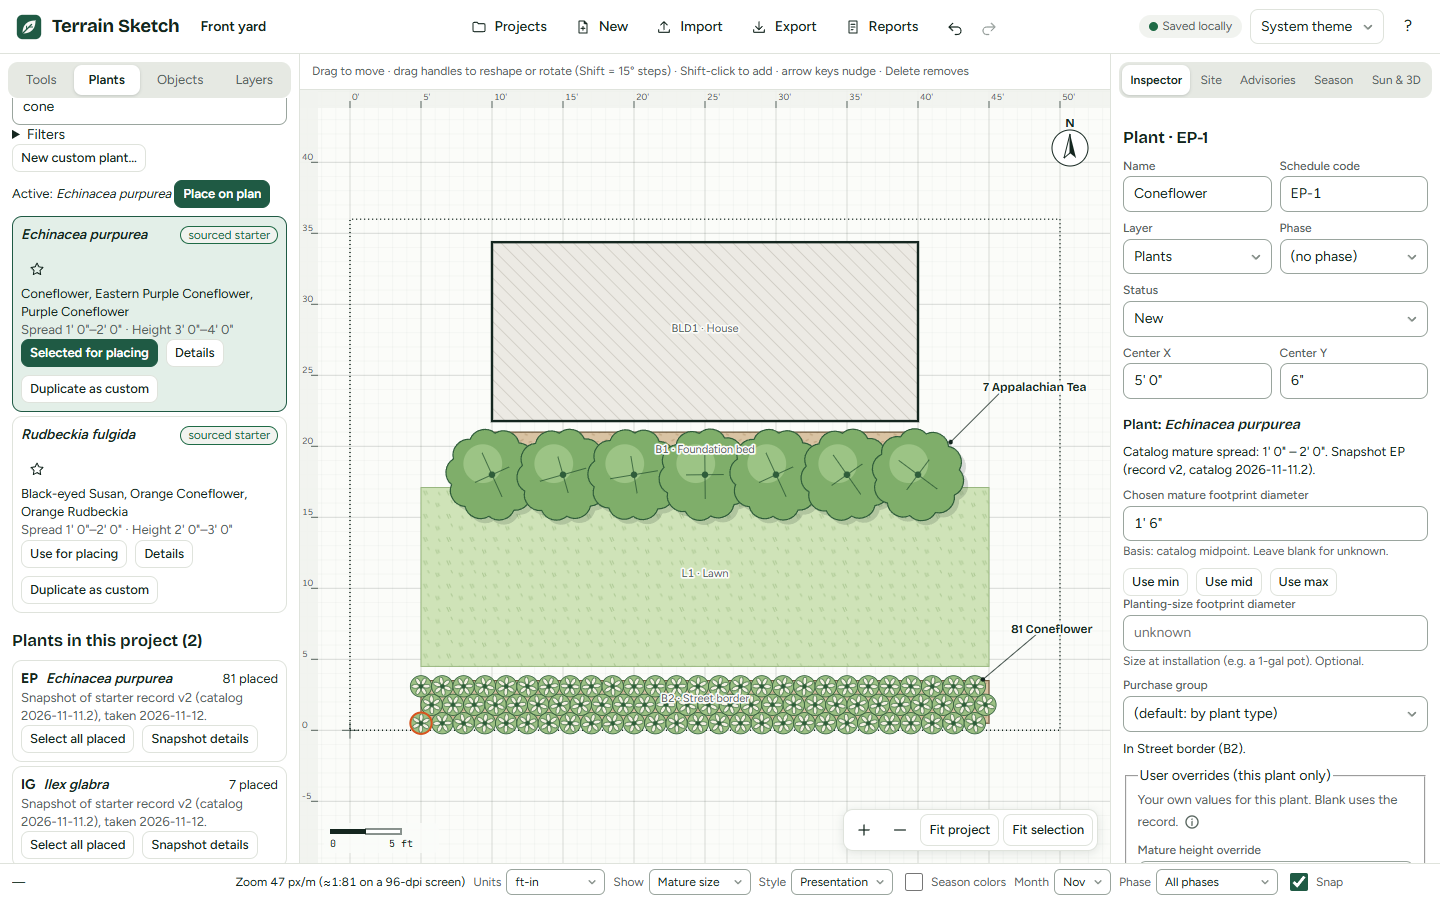
The catalog
Open the Plants tab. Type a botanical or common name in the search box. Open Filters to narrow the list by plant type, light, moisture, hardiness zone and whether the plant stays green. You can also tick Favorites only. Use the star on a plant to make it a favorite.
The built-in list has 53 plants: trees, shrubs, perennials, grasses, groundcovers, ferns, bulbs and a biennial. Thirty-one are North American species with their facts quoted from two public plant databases. Twenty-two come from Europe, the Mediterranean and Asia (lavender, boxwood, ginkgo, olive, snowdrop and others); their facts are quoted from one of those databases, a North Carolina one, so their soil moisture is shown as unknown, their bloom time is a season, with months for six of them only, and hardiness is in USDA zones. To narrow the list, type in the search box or open Filters and choose a Type, Light or another value. Where the two databases disagree, or a value is missing, the plant's details say so. When you filter by Moisture, the plants with no moisture value are listed only while Include plants where a filtered value is unknown is ticked.
The built-in plants are marked sourced starter. The app says they are research candidates, not recommendations (the small i button under Plant catalog opens that note in full). Plants you add are marked custom.
How plants look on the plan
Set by Style in the status bar. In Presentation, each plant is drawn as a small symbol that shows its type, inside a circle of its real size: a scalloped canopy with many small bumps and a trunk dot for a tree, a scalloped outline with fewer, larger bumps for a shrub, spokes for a grass, petals for a perennial, annual, biennial, bulb or edible, a low mat with a finely scalloped edge and a scatter of dots for a groundcover, a ring of fronds for a fern, and a plain mound for any other type or when the type is not recorded. Each symbol is turned a little differently so a planting does not look stamped. The symbol shows the plant type only. It says nothing about the real shape or flower color of that plant, and the petals are cream unless Season colors is on. Beds, lawn, paving, water and buildings also get a light texture. A plant with no recorded mature size keeps the plain dashed marker. Click a plant anywhere on its circle to select it.
Plants placed together get one count label with a leader line, for example 7 Appalachian Tea. A label appears for each Fill with plants… and for each group whose plants are all the same type. The plants it names do not repeat their codes on screen; switch to Working to see every code. A group of mixed plants gets no label. A label is placed beside its plants where it covers no plant, no bed name and no other label; on a crowded plan with no free spot nearby it can still cover something.
Working is the plain drawing: flat colors, no symbols, no textures, no count labels. Your choice is kept in this browser only. It is not part of your project, is not undoable, and is not saved to a backup or to the server. The SVG plan and PNG preview use the style you have chosen. The PDF packet has its own Plan style choice. On paper, the presentation style keeps every plant code and number, uses plain softer fills instead of textures, and adds the count labels.
Details, sources and unknowns
Click Details on a plant to see what is known: size, light, moisture, hardiness, seasonal interest, maintenance notes and where each fact came from. Each value has a badge: verified (it has a source), user (you entered it) or unknown.
When a value is shown as unknown, it means nobody has recorded it. It does not mean zero, safe or unsuitable. The app does not guess or fill gaps.
Placing plants
- Click Use for placing on a plant. The Place plant tool turns on.
- Click on the plan. Each click places one plant and counts as one undo step.
- Press Esc to go back to Select.
Below the catalog, Plants in this project lists each plant used, how many you placed and a Select all placed button. The project keeps its own copy (a snapshot) of each plant's record. If the catalog later changes, your design does not change silently. When a newer record exists you can choose Update snapshot (undoable).
Fill with plants
Select a bed (or another plantable area) and click Fill with plants… in the Inspector, or in the right-click menu. You need to have chosen a plant first. The dialog asks for:
- Pattern: Triangular (offset rows) or Square grid.
- Center-to-center spacing. You choose it. The app does not suggest a spacing from the plant's size.
- Grid origin X and Y, Grid rotation and Edge inset.
- Containment: Plant centers inside the bed or Whole mature footprint inside the bed. The second needs a known mature spread.
- Tick boxes to avoid plants already in the bed and to avoid structures and paths.
- Maximum plants, an optional Random offset, and a Seed. The same seed gives the same layout.
A preview shows on the plan and a count appears in the dialog. Click Place plants to accept. The fill follows the real shape of the bed, minus any holes, and is one undo step.
Your own plants
Click New custom plant… to add a plant. Fill in only what you know and leave the rest blank, which stays unknown. Click Save to my library. You can also click Duplicate as custom on any plant to start from its record, and Edit or Delete your own plants. A backup archive carries your custom plants too (see Saving and backups).
Your own values for one plant
Select a placed plant. In the Inspector, User overrides (this plant only) lets you set your own mature height, light or moisture for that one plant. The plan, advisories, 3D view and reports then use your value and label it user override. The catalog record does not change.
Mature size or planting size
The Show menu in the status bar switches plants between their Mature size and their Planting size (the size at installation, which you can enter in the Inspector). The Inspector also has Chosen mature footprint diameter for a plant, and a Purchase group.
Site, sun and 3D
The Site tab
Open Site in the right panel. Every field is optional. When you are done, click Apply site settings (one undo step).
- Orientation: North (degrees clockwise from plan-up). 0 means north is up on the plan. 90 means north points right. The north arrow on the plan turns to match.
- Location: type your Latitude and Longitude, and choose the Project time zone (the property's, not necessarily your computer's). The app never looks up your location. The note on the tab says it is used only for sun modeling on this device and is never sent anywhere.
- USDA hardiness zone and Zone source: type them yourself, for example 6a.
- Site record: recorded width and depth, measurement notes and site notes.
- Site default conditions (observed): sun hours, moisture, drainage, soil texture, pH and exposure that you observed. A "Conditions region" you draw on the plan overrides these in its own area.
- Purchasing: Currency, Tax % and Plant allowance %.
- Browser storage: how much space is used, and a button to ask the browser to keep your storage. See Saving and backups.
The Sun & 3D tab
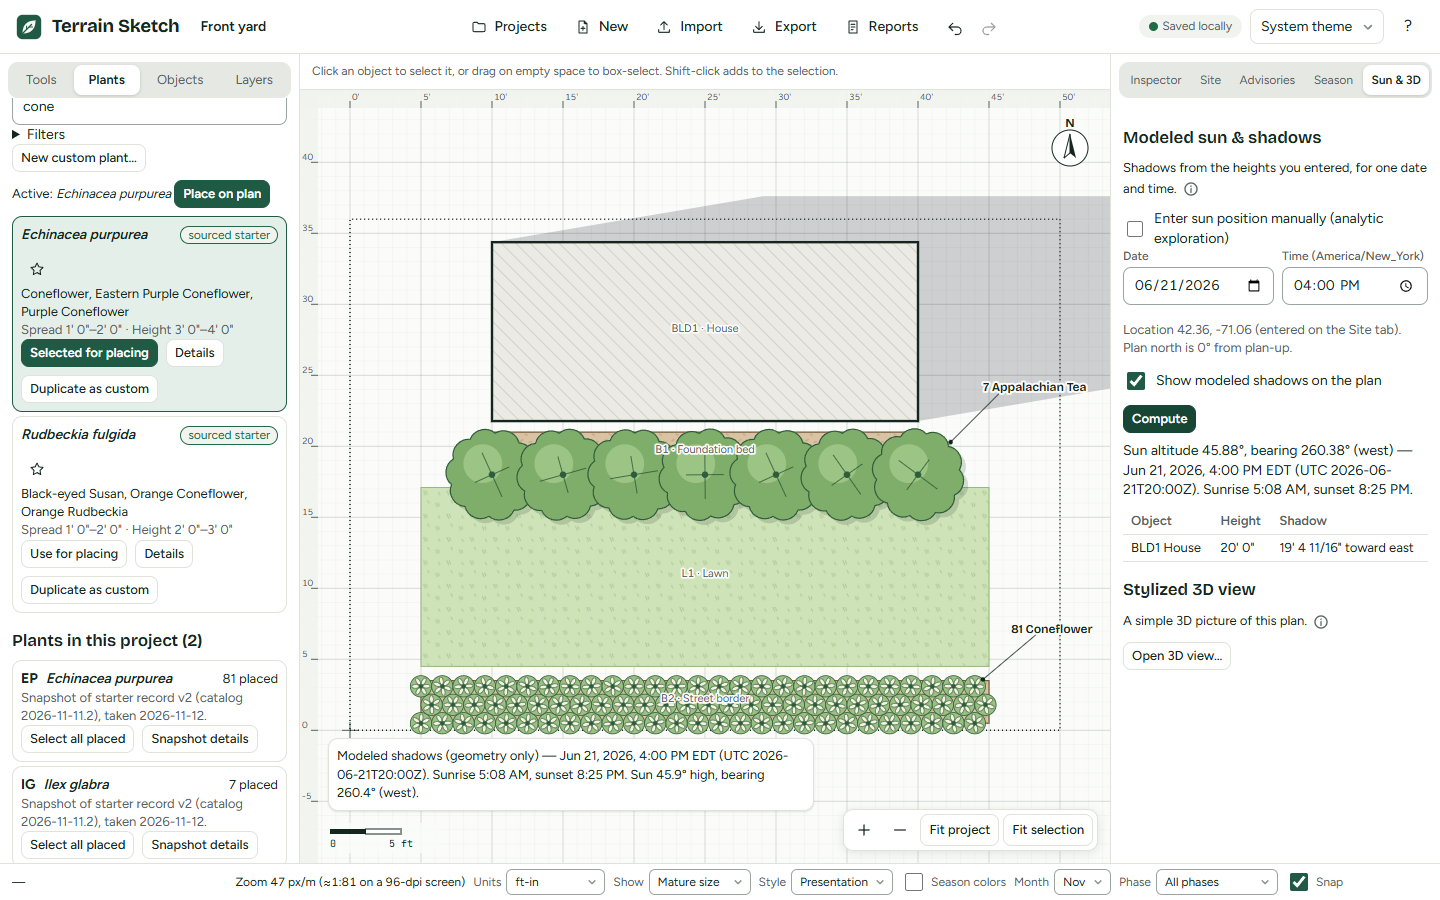
The sun and shadow tools need a latitude, a longitude and a time zone on the Site tab. Without them you can still enter a sun position by hand.
- Choose a Date and a Time. Or tick Enter sun position manually (analytic exploration) and type a Sun altitude and Sun bearing.
- Tick Show modeled shadows on the plan.
- Click Compute. The panel reports the sun's height and direction, and for a date it gives sunrise and sunset. It also lists each object with a height and its shadow.
Shadows come only from objects that have a height: buildings, fences, trellises, tree canopies and similar. Enter heights in the Inspector. The app never invents a height.
This is a geometric model of shadows on level ground. It is not a weather, foliage or plant-light model, and one moment does not describe a whole season. Your own observed sun hours are separate. Treat it as a sketch, not a promise. The same caveat sits behind the small i button next to the short line at the top of the Sun & 3D tab.
The 3D view
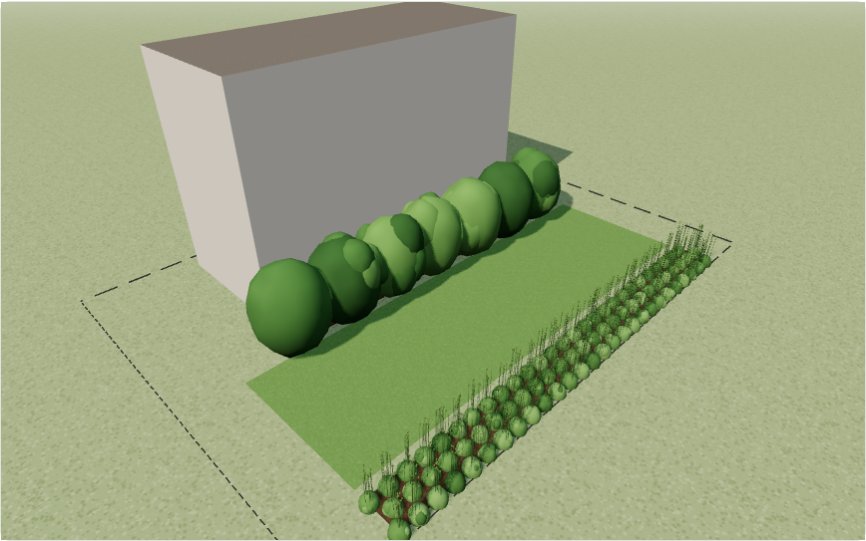
Click Open 3D view… for a 3D picture of your design. Each plant is as wide as its footprint on the plan and as tall as its height; its shape shows only its type. Trees get a trunk and a leafy crown, shrubs a rounded leafy mass, grasses a fountain of blades, and perennials and similar plants low leaves with stems. With Season colors on, plants that flower in the chosen month show flower heads in the season color, which is not the real flower color. Plants in a raised bed or container stand on its top. Lawn, beds, paving, roofs and wood have simple surface textures drawn by the app. Drag to orbit, right-drag to pan and scroll to zoom. In the Eye level mode, W A S D or the arrow keys walk and Q E turn. Click an object to select it in the plan. Objects with no height are drawn flat and listed. Plants use the middle of their recorded height range, or a flat marker if no height is known. If your device cannot show 3D, the app says so, and everything is still available in the plan.
Advisories
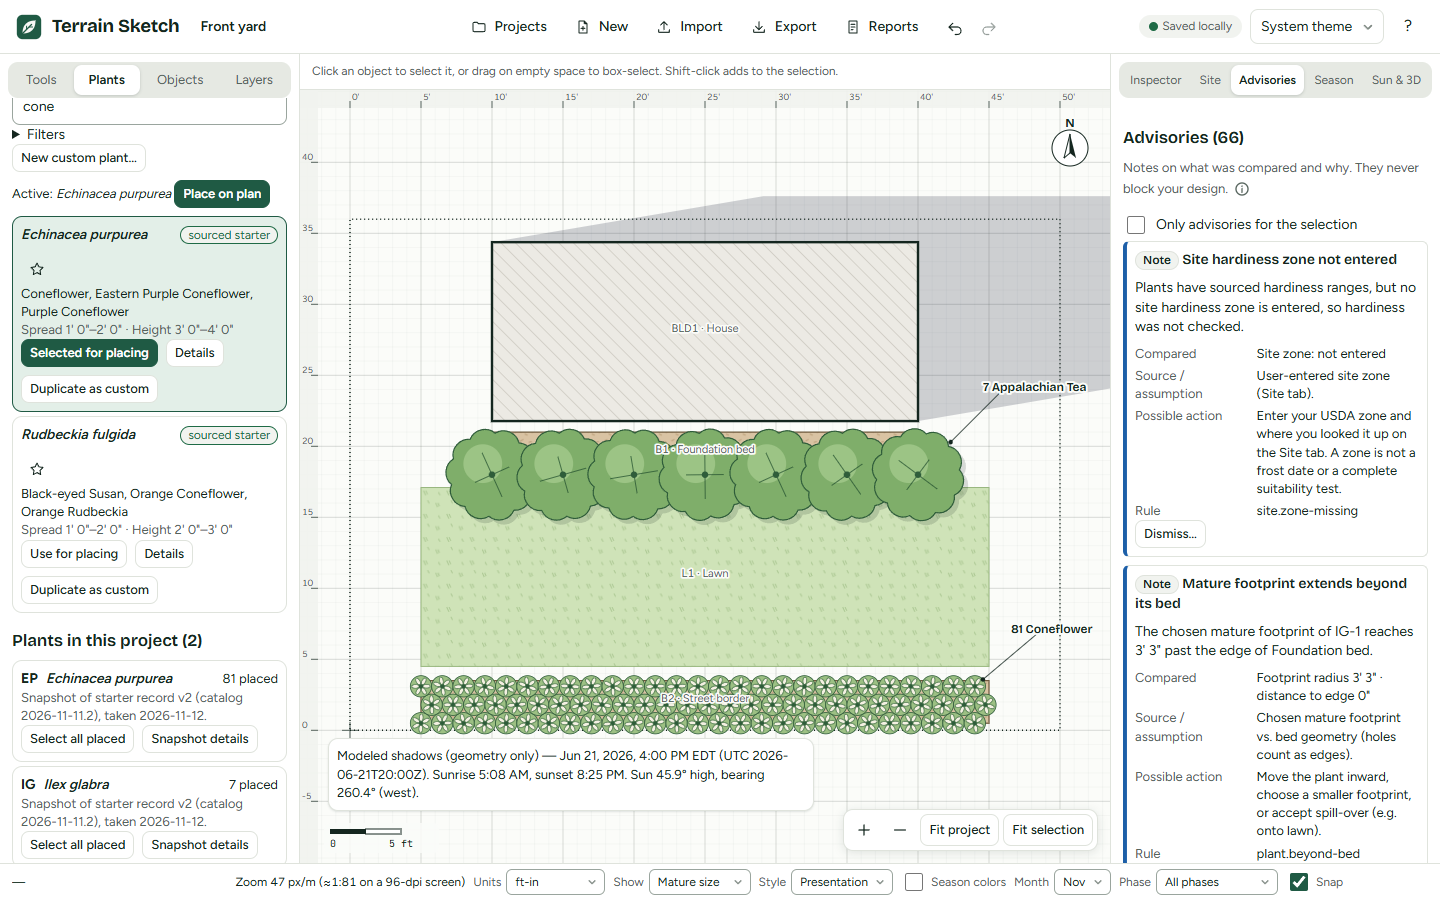
Open Advisories in the right panel. Each advisory says what was compared, where the information came from, and a possible action. Advisories never block your design. They are there to make you look twice.
What is checked
- Plant data incomplete: the plant has unknown values.
- Known light mismatch and Known moisture mismatch: a plant's recorded needs do not match the conditions where you put it.
- Outside sourced hardiness range and Site hardiness zone not entered.
- Potential mature crowding: plants whose mature sizes overlap.
- Mature footprint extends beyond its bed and Plant overlaps a structure or path.
- Overlapping conditions regions disagree.
- Costs incomplete: a price is missing.
- Seasonal timing not localized to this site.
Click the Show … object(s) button on an advisory to find the objects it is about. Dismiss… hides one, and you can give a reason. Dismissed advisories are listed under Dismissed, where Restore brings one back.
No advisory does not mean your design is suitable or safe. The checks only use data that is known. Always check a plant's needs yourself.
Seasons and phases
The Season tab
- Month view: choose a Month and tick Color plants by season on the plan. The status bar has the same Season colors and Month controls. Pink means flowering that month (from the source months or your observations). Hatched means the timing is unknown or only a broad season. Green is foliage and dark green is evergreen.
- Illustrative size preview: a slider that shrinks the mature sizes on screen so you can imagine an earlier year. It is not a growth prediction and is not saved.
- Seasonal-interest matrix: a chart of each plant by month and kind of interest.
- Site observations: note what you actually see, such as bloom or fall color, with the months. An observation of that kind takes the place of the source timing for that plant on your site.
- Tasks & maintenance checklist: your own list of jobs by month and phase. It goes into the installation packet. The app does not write maintenance advice for you.
Seasonal timing in the catalog comes from sources and is not specific to your yard unless you record observations.
Installation phases
Phases let you plan work in stages, such as "front beds this spring". In the Layers tab, under Installation phases, click Add phase, Rename or Remove. Give objects a phase in the Inspector, from the right-click menu, or by selecting objects and choosing a phase under Assign … selected to phase, then Apply.
The Phase menu in the status bar shows the project only up to the phase you choose, with All phases as the default. The PDF packet and plan exports have their own phase choices.
Reports, exports and printing
Reports
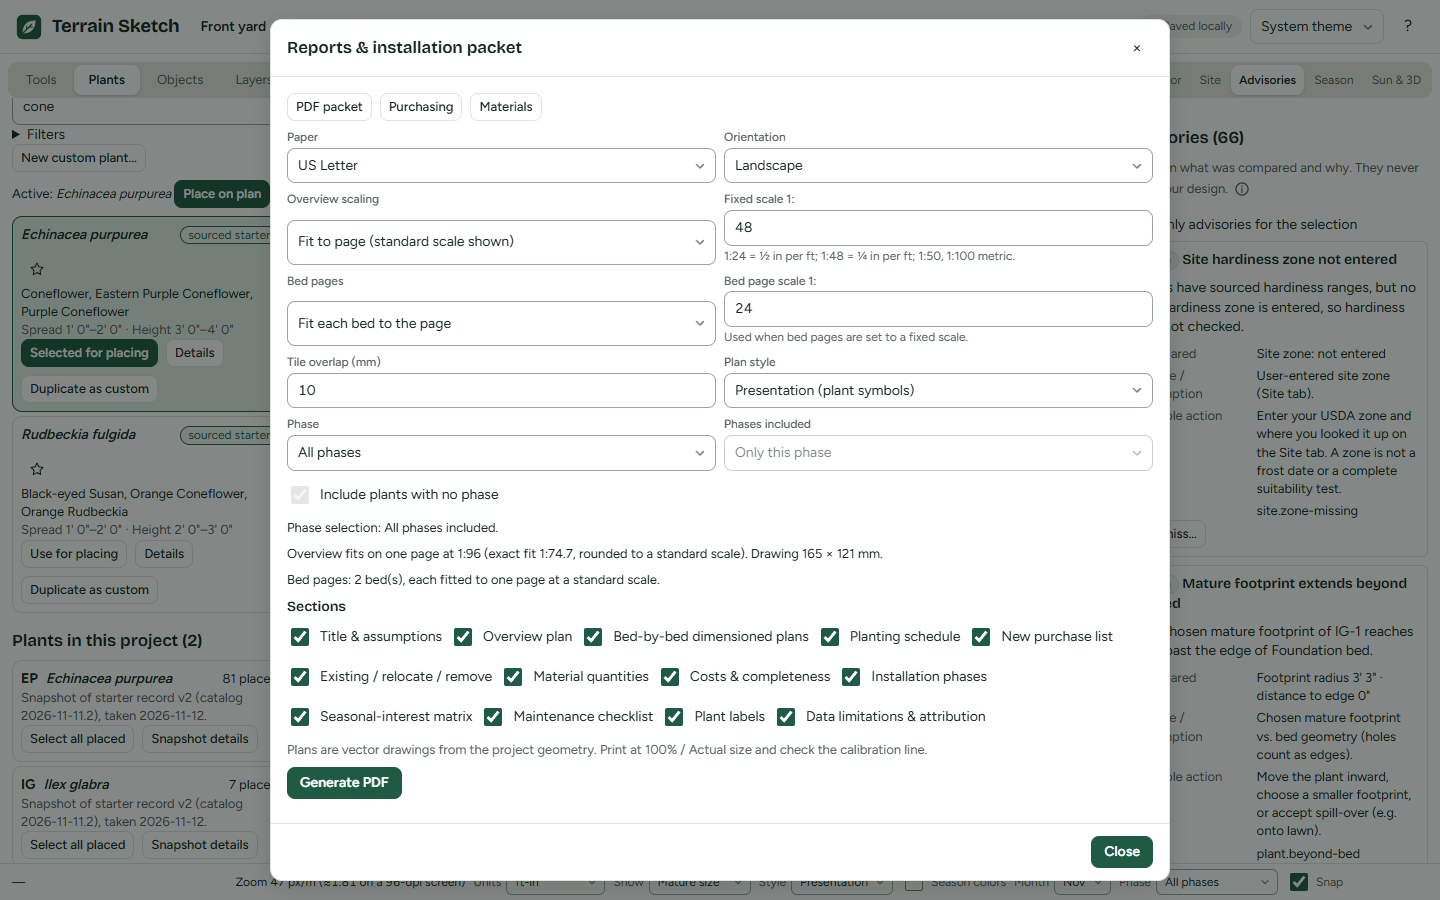
Click Reports. The dialog Reports & installation packet has three tabs.
- PDF packet: makes the installation packet as a PDF. Choose the Paper (US Letter, A4, Tabloid (11×17) or A3), the Orientation, and how to scale the overview plan and each bed page. Plan style chooses Presentation (plant symbols) or Working (plain circles) for the plan pages; it starts at the style shown on your screen. Tick which Sections to include: title and assumptions, overview plan, bed-by-bed plans, planting schedule, new purchase list, existing / relocate / remove, material quantities, costs and completeness, installation phases, seasonal-interest matrix, maintenance checklist, plant labels, and data limitations and attribution. Click Generate PDF.
- Purchasing: for each plant, enter Plants per pack, Price, On hand, Container and Supplier, then click Apply. The dialog shows how many packs to buy. Enter only what you know: a missing price makes the total incomplete instead of counting as zero.
- Materials: click Add material to work out mulch, fabric, edging and similar. Choose a type (Volume (area × depth), Area (fabric, sod, pavers), Edging length or Count of objects), the objects it Applies to, an allowance and a pack size. Quantities come from the real shapes in your design, with holes left out.
Export
Click Export for files you keep or share.
- Portable archive (.zip): the complete backup. It holds your project, its plant records, your reference images and your custom plants. Files end in
.garden.zip. - Project JSON: a single file. It does not include reference images, and the app warns you.
- Vector SVG plan: a drawing in millimeters at the scale you set under SVG scale 1:. Leave it empty for an automatic scale. It uses the plan style chosen in the status bar.
- PNG preview: a picture for sharing. It is not for scaled printing.
- PDF installation packet…: opens the Reports dialog.
- Plant schedule CSV, Shopping CSV and Materials CSV: spreadsheet files. The shopping file lists new purchases only.
Printing at true scale
- Use the PDF packet or the SVG plan. Do not print the editor page itself: it prints blank on purpose.
- In the PDF settings, pick a fixed scale if you need one. The hint reads: 1:24 is ½ inch per foot, 1:48 is ¼ inch per foot, and 1:50 and 1:100 are metric.
- In your print dialog, choose 100% or Actual size. Do not choose "Fit to page".
- Measure the calibration line on the printed page to check the scale.
- If a plan is too big for one sheet at a fixed scale, it is split into tiles with overlap and registration marks. It is never shrunk.
Saving and backups
Autosave in this browser
Your work is saved automatically in this browser, on this device. The save status in the top bar tells you the truth: Saved locally, Unsaved changes, Saving…, Conflict — changed in another tab, Save failed — not saved or Not saved — storage unavailable. If saving fails, a bar appears with an Export backup now button.
Autosave is not a backup. It lives in this browser at this web address. Clearing site data, a private or incognito window, a different browser, or a different web address (even http instead of https) means your projects are gone or out of reach.
Working without a connection
The first time you open the site with a connection, your browser keeps a copy of the app, this guide and the home page. After that the app opens with no internet connection, and you can draw, place plants, look at the 3D view and make the PDF packet as usual. Your work is saved in this browser, as always.
What needs a connection: signing in, saving to the server, opening projects from the server and sharing. While you are offline the top bar says so, and a signed-in project is sent to the server when the connection returns. A new version of the site is picked up the next time you open it with a connection.
This needs a current browser and a normal (not private) window. Clearing the browser's site data removes the stored copy of the app together with your projects, so keep exporting backups.
The Projects dialog
Click Projects. You see each project in this browser with its last update and object count. For each one you can:
- Open it.
- Duplicate as alternative: make a copy to try another idea.
- Delete it from this browser, after a confirmation. Export a backup first if you might need it.
To rename the open project, type in the project name box in the top bar. Lower in the dialog you can Save checkpoint of current design… to keep a named snapshot, then later use Restore into project or Open as new project. Compare alternatives shows two projects side by side.
Backing up and moving to another computer
- On the old computer, click Export and then Portable archive (.zip). Keep the file somewhere safe, such as another drive or a cloud folder you control.
- Copy the file to the new computer.
- Open Terrain Sketch there and click Import. Choose the file.
- A dialog titled Import project explains what is in the file. Click Import as new copy. Your open project is not touched.
If the file is not a valid project, you see Import rejected and your open project stays as it was. Files you import are checked before anything opens. If the archive has custom plants, the import adds them without overwriting yours.
Storage warnings
The Site tab, under Browser storage, shows how much space this site uses. Ask browser to keep storage (persistent) asks the browser not to clear it. The browser may say no, so still keep backups. Some browsers block storage in private windows. In that case the app works, but only until you close the tab.
Accounts
Accounts are optional, and they exist only if the person who runs this site has set them up. If you see no Account, Sign in or Set up accounts button in the top bar, this site has none, and everything else in this guide still works.
The person who runs a site can also require an account. Then the app opens with a Sign in to start designing screen: click Create a free account (where anyone can sign up) or Sign in. The editor appears once you are signed in, and the screen comes back when you sign out. Your projects are still saved in this browser too.
With an account you can keep a copy of a project on the site's server, open it on another device, go back to older versions, and share it with someone. Your projects are still saved in the browser either way.
Getting an account
How it works depends on the site's setting:
- By invitation: the site admin gives you an invite link. Open it, and the Create your account form appears. Enter your name, email and a password, then click Create account. A link can be used once and expires after a number of days. If it was made for a particular address, use that address.
- Open sign-up: anyone can create a free account. Click Sign in and then Create an account, or use the Create a free account link on the home page. Enter your name, email and a password. If the site sends email, it emails you a link: open it and click Confirm and sign in to finish (the link works for 48 hours; Send the email again makes a new one). You cannot sign in until the address is confirmed. On a site that does not send email, the address is not confirmed and you are signed in at once.
- Closed: the site says it is not adding new accounts.
Passwords need at least 10 characters. Signing in works only on a secure (https) address.
Signing in and out
Click Sign in in the top bar, enter your email and password, and click Sign in. When you are signed in, the button shows your name. Click it to see the Account dialog, which has Sign out.
Saving a project to the server
- The first time you sign in or create an account, the app asks whether to Turn on automatic saving (creating an account turns it on). With it on, each project you edit is saved to the server a few seconds after you stop editing; you do not need to click anything. Projects you never edit are not uploaded. Projects has Save all to server, a switch to turn automatic saving off or on, and Keep this project only in this browser for single projects.
- If you choose Not now, I will save manually, open the project and click Save to server in the header.
- The first time, a dialog tells you what will be stored: the whole project, including your site location and coordinates if you entered them, notes, plants, prices and any reference images. It also says that whoever runs the server can technically read what is stored. Click Save to server to go on, or Cancel.
- After that, the status beside the button tells you where things stand: Not on server, Saved to server, Saving to server soon… (or Not synced to server when saving by hand), Saving to server…, Offline, Server save failed, Not saved to server, Changed on server, Newer version on the server, Only in this browser or View only. The button says Sync now, Retry, Resolve…, Load or Save to server when there is something to do. Automatic saving stops and asks you when the server copy was changed elsewhere, your server storage or project limit is full, or the project is too large.
Nothing is uploaded unless you turned on automatic saving or clicked the button. If a server save fails, your work is still saved in this browser. Automatic saves within about 10 minutes of each other are merged into one saved version; saves you start yourself are always kept.
Opening a project on another device
Sign in on the other device. Click Projects, find On the server, and click Open next to the project. This puts a copy in that browser and links it to the server. If that browser already has a copy with changes that are not on the server, you can choose Replace with server version or Keep both.
When the project changed somewhere else
If you saved the project from another browser, device or tab, a dialog titled Changed on the server appears when you try to save. Pick one:
- Load the server version: replaces this browser's copy. Changes made here since the last sync are lost.
- Keep mine: replaces the server version with this browser's copy.
- Save mine as a copy: stores your version as a new project, and the original goes back to the server version.
Saved versions
The server keeps the last 20 versions saved to it. In Projects, under On the server, click Versions… to see them. Open as copy puts that version in this browser as a separate project, so you can look at it. Nothing on the server changes. Restore makes that version the current one again. The version it replaces stays in the list.
Your name and email address
In the Account dialog, click Change name or email….
- Name: type the new name and click Save. It changes at once. People you share projects with, and the site admins, see this name.
- Email address: type the new address and your current password, then click Save. The site emails a link to the new address. Open it and click Confirm and sign in. Your address changes only then; until then you sign in with the old one. The link works once, for 48 hours. The old address gets a note that the change was made. Projects that other people shared with you stay shared.
- On a site that does not send email, the address cannot be changed here. Ask the person who runs the site.
Your password
- Change password… is in the Account dialog. Other browsers signed in to your account are signed out.
- Forgot your password? If the site sends email, click Forgot your password? in the Sign in dialog, enter your email and click Send link. The emailed link works once, for 1 hour. Otherwise ask the site admin for a password reset link. Either way, open the link, type a new password twice, and click Set password. It signs you out everywhere.
Your data
- Download my data (in the Account dialog) gives you a zip file with each project you saved to the server as a backup archive, with its images and saved versions.
- Delete account… removes your account and the projects you saved to the server, including their versions and images. It also removes your access to projects shared with you. You must type your password. Projects saved in this browser are not deleted. If you want a copy of what is on the server, use Download my data first.
For the site admin
This section is for the person who runs the site. Setting up accounts on the host (the config file, the database and the first admin) is described in DEPLOY.md, which comes with the site files. It is for the site owner only.
Manage users
Sign in as an admin, click your name in the top bar, then click Manage users….
- Create invite link: optionally enter Their email (optional). Leave it empty for a link that anyone can use once. The link works once and expires after the number of days the dialog states. If the site sends email and you entered an address, the invite is emailed to that address. Otherwise copy the link with Copy link and send it yourself. Unused links are listed under Invite links not used yet, and Revoke cancels one.
- Disable and Enable: a disabled person is signed out everywhere and cannot sign in. Their projects stay.
- Reset link: makes a one-time link for someone who forgot a password. The link is shown only once. Send it to them yourself. It works once, expires, and signs them out everywhere.
- Make admin and Remove admin: an admin can see every account, make invites and reset links, disable accounts and change who is an admin, including you.
The Email section says whether the site sends email. If it does, Send a test email sends one to you; if it fails, the message says why. The user list shows each account's name, email (marked not confirmed while a new account has not opened its confirmation link), status, number of projects and join date. The screen shows only how many projects each account owns, never what is in them. A disabled account keeps its projects. Deleting an account is up to its owner.
Whoever runs the server can technically read what is stored there. The app tells every user this before their first server save.
Keyboard shortcuts
These work when the plan or the page has focus, not while you type in a field. Press ? in the app to see the same list.
| Keys | What it does |
|---|---|
| Ctrl+Z | Undo |
| Ctrl+Shift+Z or Ctrl+Y | Redo |
| Esc | Cancel the current drawing; press again to return to Select and clear the selection |
| Delete or Backspace | Delete the selection (locked items are protected) |
| Arrow keys | Nudge by one grid step (Shift ×5, Alt ×0.1) |
| Enter | Finish a polygon, curve or path |
| Backspace | Remove the last point while drawing |
| Shift | Constrain to horizontal or vertical, to a square, or to 15° rotation |
| Space + drag | Pan |
| + − 0 F | Zoom in, zoom out, fit project, fit selection |
| Ctrl+C, Ctrl+X, Ctrl+V | Copy, cut, paste (paste also works in another project in this tab) |
| Ctrl+D | Duplicate |
| Shift+F10 or the Menu key | Open the menu of commands for the selection (also right-click, or a long press on a touch screen) |
| Ctrl+G | Group |
| Ctrl+Shift+G | Ungroup |
| Ctrl+A | Select all visible |
| ? | Open Help & shortcuts |
| ← → Home End | Switch panel tabs (when a tab has focus) |
| V | Select tool |
| H | Pan tool |
| R | Rectangle tool |
| E | Ellipse tool |
| P | Polygon tool |
| C | Curved bed tool |
| O | Hole / cutout tool |
| W | Path / fence tool |
| L | Place plant tool |
| S | Structure tool |
| D | Dimension tool |
| N | Text note tool |
| M | Measure tool |
On a Mac, Ctrl is the ⌘ key in the menu labels.
Questions and answers
Where are my projects saved?
In this browser, on this device, in the browser's own storage for this site. They are not sent anywhere unless you sign in on a site that has accounts and either turn on automatic saving or click Save to server. Because browser storage is not a backup, use Export to keep a copy.
Do I need an account?
No. Everything in the editor works without one. An account only adds saving to the site's server, opening projects on other devices, older versions and sharing. Many sites have no accounts at all.
How do I move a project to another computer?
Click Export and Portable archive (.zip). Copy the file to the other computer, open Terrain Sketch there, click Import, and click Import as new copy. If both computers can sign in to the same site, you can use Save to server instead.
Why does a plant say "unknown"?
Because that fact has not been recorded for it. The app shows only values that have a source, values you entered yourself, and "unknown" for everything else. Unknown does not mean zero, safe or unsuitable. You can fill in a value for one plant with User overrides, or make your own record with New custom plant….
Is the sun and shade exact?
No. It is a geometric model of shadows on level ground, using the heights you entered, for the date and time you chose. It does not include weather, leaves or the light a plant actually gets. Use it as a guide and watch your own yard too.
How do I print at the right scale?
Click Reports, choose your paper and a fixed scale such as 1:48, and click Generate PDF. Print the PDF at 100% or Actual size, not "Fit to page", then check the calibration line with a ruler. See Reports, exports and printing.
Can I use it on a phone or tablet?
Yes. On narrow screens the bottom bar switches between Plan, Tools & lists and Inspect. Pinch to zoom, and press and hold for the right-click menu. Drawing small shapes is easier with Enter numerically… or on a larger screen.
I forgot my password.
If the Sign in dialog shows Forgot your password?, use it: the site emails you a link. Otherwise ask the site admin for a password reset link. Open the link, choose a new password, and you are signed in. Your projects in this browser are not affected.
How do I delete my data?
Projects in this browser: open Projects and click Delete on each one. Server copies: in Projects under On the server, click Delete from server. Or use Account and Delete account… to remove the account and everything you saved to the server. You can use Download my data first.
Can someone else edit my garden?
Only if you share it. Sharing needs an account and a project saved to the server, and you choose Viewer (read only) or Editor for each person. Without accounts, no one else can reach your projects through this app. Anyone who uses the same browser profile on your computer can see what is saved in it.
What does the site owner see?
Without an account, nothing: your projects stay in your browser. With an account and a project saved to the server, whoever runs the server can technically read what is stored there, including your email and name and the projects you saved. The admin screen shows only counts of projects, but the owner has access to the server itself. Sites say so before your first server save.
Does it work offline?
Yes, after your first visit. See Working without a connection. Saving to the server, signing in and sharing need a connection.
Why did my copy not include the reference photo?
Copy and paste leaves out reference images. Add the image again where you need it, and calibrate it. Also note that Project JSON export omits images. Use Portable archive (.zip) for a complete backup.
How do I undo?
Press Ctrl+Z or click the Undo arrow in the top bar. Ctrl+Shift+Z or Ctrl+Y redoes. One drag, one drawing or one Inspector Apply is one step.
Can I type a length in feet and inches?
Yes. Try 12' 6", 12 ft 6 in, 12.5 ft, 150 in, 3.81 m or 381 cm. A bare number uses your display unit. Switch the display unit with Units in the status bar.
The app says my change was refused. What happened?
Terrain Sketch will not accept a change that would make the design invalid, such as a shape with too few points. It leaves your design as it was. Read the message, adjust, and try again.
Privacy
The short version
- There are no ads and no analytics or tracking.
- The app never reads your location by itself. If you want sun modeling, you type the latitude and longitude, and they stay on your device.
- Your projects, images, custom plants, favorites and settings are kept in your browser's storage on your device.
- Nothing leaves your browser unless you choose it. On a site with accounts, a project goes to the site's own server only when you are signed in and have turned on automatic saving (or click Save to server), and only projects you edit or save are sent.
- Files you import are treated as untrusted and are checked before anything opens.
With an account
The server keeps:
- your email address and display name,
- a scrambled form of your password, never the password itself,
- the projects you save to the server, with their last 20 saved versions, and the reference images they use,
- the email addresses you share a project with, and whether each is a Viewer or an Editor,
- sign-in sessions, which hold a scrambled form of your session cookie and not your address or browser details,
- records used only to slow down repeated wrong sign-in attempts. They are keyed by a scrambled hash, not readable addresses, and they are deleted after a day.
Before your first server save, the app tells you what will be stored. This includes your site coordinates if you entered them, notes, prices and images. The people you share a project with can see its contents and your display name.
Whoever runs the site can technically read what is stored on its server. Do not save anything there that you would not want them to see.
What is not done
- Nothing is sent to anyone else.
- The site emails you only if its owner set up email, and then only to confirm your address or to send a password reset link you asked for. Invite links, and reset links made by the site admin, are sent to you by the admin.
Your choices
You can use Download my data to get everything the server holds for you, and Delete account… to remove your account and its server projects. Projects stored in your browser stay under your control: delete them from Projects, or clear this site's data in your browser settings.